Space Invaders in WebGL
By LluísE
About
Created by LluísE on October of 2022.
This game is made with JavaScript and WebGL. It started as a class assignement at Informàtica Gràfica (Graphic informatics), at the Universitat de Girona (UdG). The main goal was to learn the basics of WebGl, however, I got a little bit carried away, and I made completly playable game, inspired by Space Invaders.
Code structure
The code is structured by the Object Oriented Programming paradigm. As such, there are multiple classes that form the game parts. These classes have been created with the prototipe way of making classes in JavaScript.
Classes
| Class name | Source file | Description |
|---|---|---|
| Graphics | graphics.js | Simple API to manage WebGL calls in a canvas. |
| Game | game.js | Control the game flow, game loop, input-output and the whole thing, basicly. |
| Spaceship | spaceship.js | Player's spaceship. It draws and moves an spaceship. |
| Enemy | enemy.js | A single enemy, with its autonomous movements and own color. |
| EnemyArmy | enemyarmy.js | Manages all the enemies, with their the coordinated bouncing, rendering, increasing speed and killing. |
| Bullet | bullet.js | A single bullet, it draws and moves itself, and allows checking colisions. |
| Arsenal | arsenal.js | Manages all the bullets, it shoots, checks colisions with the enemies, other bullets or the spaceship; decides when a bullet has killed and when it needs to be destroyed. |
| PlayButton | playbutton.js | It manages the play button, and the mouse clicks over it. |
| Level | levels.js | Level designs and configurations |
| Flag | flag.js | Flag colors and patters to apply to any matrix. |
| MODELS | models.js | Not a real class. It holds the model's data, it calculates models such as circles and caches calculated models. |
Graphics
All direct WebGL calls are managed by graphics.js. We use a single WebGL program, created at graphics.js → init_shaders(). And we have 5 parameters we can modify for each model we render:
Transformation parameters
myColor
The shape color, defined as [r, g, b, a]. The parameters r, g, and b are a decimal value between 0 and 1, and so is alpha, although doesn't do much here.
u_resolution
The resolution for the model, we normaly just set it to [1.0, 1.0].
u_translation
The translation when drawing model, we specify two coordinates: [x, y], between -1 and +1.
u_rotation
The model rotation. The Graphics class expects the value in radiants, and then it transformates it to the appropiate value by calculating sin(angle).
u_scale
This parameter is used, as the obvious name suggests, to scale the model, either in the x or in the y coordinates, or both of them. Furthermore, the Graphics API allows applying a constant factor to all models drawn in the canvas, to uniformly scale the whole game. Behind the scenes, it combines the model scale with the contsant factor, and passes resulting value to the shader, it also corrects the translations to keep consintency.
Buffers
In this project, and to keep it simple, each class instance that needs drawing, generates a WebGL buffer for itself. As an example, Enemy generates a buffer for each instance of an enemy. Considering how all enemy models are the same, we could have optimized this part by sharing the buffer between all enemies, work for the future i guess ‾\_(ツ)_/‾. All buffers are created through graphics.js → create_buffer(model), by passing an object with vertices: {vertices: [...]}, and since we pass the object as a reference to create_buffer, the method will add idBufferVertices to the object to control which buffer is using.
Shader
#version 300 es
in vec2 a_position;

uniform vec2 u_resolution;
uniform vec2 u_translation;
uniform vec2 u_rotation;
uniform vec2 u_scale;

void main() {
  // Scale the position
  vec2 scaledPosition = a_position * u_scale;

  // Rotate the position
  vec2 rotatedPosition = vec2(
    scaledPosition.x * u_rotation.y + scaledPosition.y * u_rotation.x,
    scaledPosition.y * u_rotation.y - scaledPosition.x * u_rotation.x);

  // Add in the translation.
  vec2 position = rotatedPosition + u_translation;

  // convert the position from pixels to 0.0 to 1.0
  vec2 zeroToOne = position / u_resolution;

  // convert from 0->1 to 0->2
  vec2 zeroToTwo = zeroToOne * 2.0;

  // convert from 0->2 to -1->+1 (clipspace)
  vec2 clipSpace = zeroToTwo - 1.0;

  gl_Position = vec4(clipSpace * vec2(1, -1), 0, 1);
}
This shader allows us to do translations, rotations and scalings easly, and through the GPU. Moreover, we can use it to define each triangle, from our models, by issuing three points: [x, y, x2, y2, x3, y3].
The shader is heavly inspired in this example from webgl2fundamentals: WebGL2 2D Scale from webgl2fundamentals.org
Fragment shader
#version 300 es
precision mediump float;
out vec4 fragmentColor;
uniform vec4 myColor;

void main() {
  fragmentColor = myColor;
}
The fragment shader is preatty simple, it just allows us to change the color per model.
Models
All models are created by triangles defined by three points (x, y).
You can easly check all the shapes used in this project, by inspecting the source code at models.js. The code also contains a simple caching mecanisme to avoid recalculating the same shape, such as when automaticly generating a circle.
Enemy model
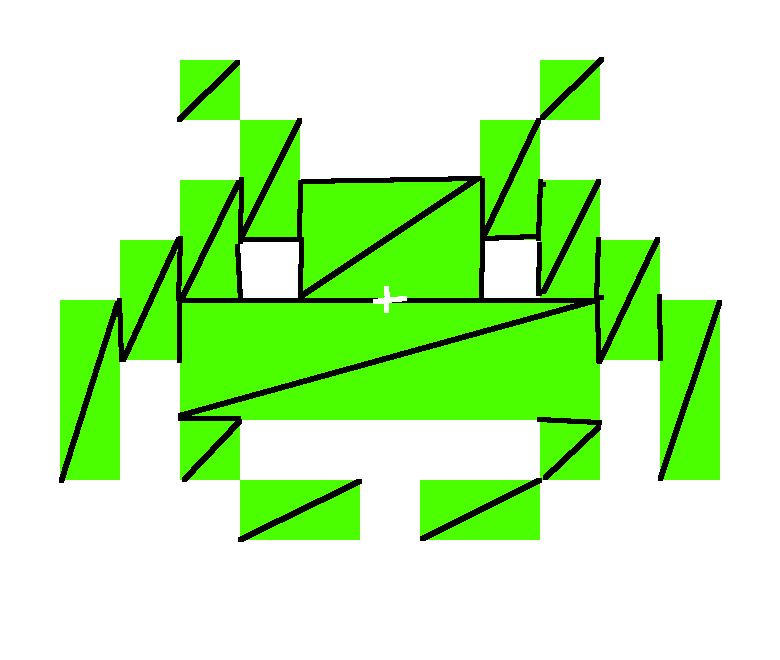
Since WebGL requires all shapes to be drawn as triangles, I had to find a way to cut the enemy model in a group of triangles. This is the structure I designed, and it worked fine.
Rendered lines
Animation
The die animation is a mixing of the shader parameters. First, it changes the color to white and fades to black, and secondly, it shrinks by progressively reducing the scale.
Spaceship model 1
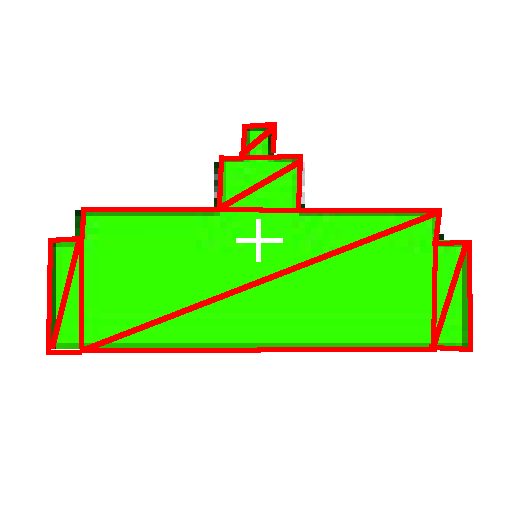
This spaceship model is based on the original Space Invaders videogame. While the code for the model is still there and can be easly activated, it has been deprecated in favor of Spaceship model 2.
Spaceship model 2
To complete the spaceship decoration, the base (green triangles at the image above) has been duplicated with appropiate scaling to generate the ilusion of borders. Furthermore, two circles have been added to the wings, those have been created through models.js → MODELS → Circle(6)
Rendered lines
Bullet
Rendered lines
Bullets are ovals created throuhg models.js → MODELS → Oval(resolution, rx, ry) with the call MODELS.Oval(12, 1, 2). Since bullets are small, we don't need a lot of resolution when drawing the circle, thats why we only use 12 sides.
To calculate an oval, I used the same formula as a circle, but I applied a deformation by multiplying the x, y coordinates with the ry and rx parameters of the function Oval:
// {i} is the current iteration step
angle = 2 * Math.PI * i / resolution;
x = Math.cos(angle)/ry;
y = Math.sin(angle)/rx;
Play button
The play button is created with two circles, the outermost is drawn first, and then the innermost gets drawn on top. Finally, we just draw a simple triangle to simbolize a play button.
In order to retrieve the click event, The PlayButton instance will listen to click events on the canvas. When a click gets detected, it will calculate the canvas offset, and will transformate the cursor position to the relative position inside the canvas, finllay, it will determinate if the click was indeed over the play button area, or not:
// Get canvas and mouse properties
const box = this.gl.canvas.getBoundingClientRect();
const real_x = event.clientX;
const real_y = event.clientY;

// Translate to ingame x and y
const x = (real_x - box.x) / box.width;
const y = (real_y - box.y) / box.height;

// Check if we were clicked
if (this.colision(x, y))
  this.callback();
Physics
The 2D area is [-1, +1] on both dimensions.
All colisions are calculated as rectangles to simplify the logic inside bullet.js:
colision(obj) {
  return !(
    ((this.y + this.size_y) < (obj.y)) ||
      (this.y > (obj.y + obj.size_y)) ||
      ((this.x + this.size_x) < obj.x) ||
      (this.x > (obj.x + obj.size_x))
  );
},
Game engine
Besides the previous pices, the game engine uses two loops to control all the events:
Tick is where all the calculations are done. It calls the tick methods of other classes and lets them perform one move in time, such as when an enemy moves right. In this step, it also calculates all phyisics interactions, such as colisions.
The draw loop, which recursively uses requestFrameAnimation, its where the rendering takes place. It iteratively calls all render() methods of other classes, such as bullets, and draws them on the canvas.
License
The MIT License (MIT)
Copyright © 2022 Luis Escaño Márquez.
Permission is hereby granted, free of charge, to any person obtaining a copy of this software and associated documentation files (the “Software”), to deal in the Software without restriction, including without limitation the rights to use, copy, modify, merge, publish, distribute, sublicense, and/or sell copies of the Software, and to permit persons to whom the Software is furnished to do so, subject to the following conditions:
The above copyright notice and this permission notice shall be included in all copies or substantial portions of the Software.
THE SOFTWARE IS PROVIDED “AS IS”, WITHOUT WARRANTY OF ANY KIND, EXPRESS OR IMPLIED, INCLUDING BUT NOT LIMITED TO THE WARRANTIES OF MERCHANTABILITY, FITNESS FOR A PARTICULAR PURPOSE AND NONINFRINGEMENT. IN NO EVENT SHALL THE AUTHORS OR COPYRIGHT HOLDERS BE LIABLE FOR ANY CLAIM, DAMAGES OR OTHER LIABILITY, WHETHER IN AN ACTION OF CONTRACT, TORT OR OTHERWISE, ARISING FROM, OUT OF OR IN CONNECTION WITH THE SOFTWARE OR THE USE OR OTHER DEALINGS IN THE SOFTWARE.